Spring Plate Install
- joepampel
- Jul 9, 2025
- 13 min read
Updated: Nov 10, 2025
My old spring plate bushings appeared to be out of round and were 36 years old in any event. I also want to be able to corner weight the car and set the ride height more easily. Adjustable spring plates seem to solve both of those issues, and my thesis is they could pay for themselves (at least partly) in time savings when setting the car up.
Step 1 is making sure you get the correct spring plate for your car. There seem to be 2 main types of torsion bars/tubes.
911's up through 1986. The torsion tube runs across the car. These are the easiest parts to find, and less expensive.
G50 equipped Carreras (1987-1989). These use 2 shorter torsion tubes split in the middle to make room for the larger Getrag transmission. A bit more scarce, and more expensive. It's a little odd because the bars are the same length, they just have a different number of teeth. They have a longer cover since they locate further out from the center of the car. It does make it easy to see if the part is going to work though, as there is no confusing the two.
I found an adjustable plate I liked the design of from Prekom. I emailed them directly in Florida on a Saturday morning to confirm they had the parts in stock, and I got a reply the same day & they shipped on Monday. Over and above service! The plates are very nicely made with what looks like passivated zinc plating and high quality welding.
I also ordered a hardware kit and bushings from Elephant Racing. No sense in putting rusty old hardware back in and generally there will probably be stuff missing anyway. The kit is well organized and comes with clear directions.
To finish it up I picked up a pair of Uro stainless steel torsion bar covers. The new bushings from ER will get mounted on the stock plates after I get them cleaned up and re-plated. There is a plating shop nearby that can do the passivated zinc as well as the cleanup ahead of that.
Removing the old plates can be a real adventure depending on the specific car and its history. I was very lucky here; there was no real rust, and everything came apart without a fight. I also did not need to remove the rear brakes which was a plus; I really don't like having to bleed the clutch actuator. The top bolt to the trailing arm is a little tight but I was able to get an impact gun on it to remove it and a torque wrench on it from behind to finish the install.
Lots of good info on the Pelican Parts boards & YouTube, although lots of owners were doing this during engine-out work so it was a little bit hard to really know what it looked like in a running car.
The most counter intuitive part for me was not using any kind of rubber grease on the bushings. Their inner surface glues on to the spring plate (originals were vulcanized on), and the outer surface is held in place by the cover so the bushing actually twists when the arm moves. People still debate this, as well as debating the widom of using superglue to attach the inner surface of the bushing to the spring plate. Not as bad as motor oil fights, but not too far behind. The CW seems to be if the bushing moves/rotates, it is more likely to squeak. Choose wisely.
For what it's worth, my install does not squeak at all, and the car changes direction a lot better now. I wish I had tackled this job earlier!
Tools:
Whatever system you use to raise the car, plus one extra jack
10mm (rocker cover), 19mm & 22mm sockets & wrenches & extensions etc.
Small & medium phillips screw drivers (for rocker cover)
10mm hex socket (for toe adjuster)
Torque wrench
Small pry bars (you might need 2)
Scribe, screwdriver or pen to mark your existing plate alignment on the trailing arm.
Angle Gauge to measure spring plate angle (I have this one: https://www.kleintools.com/catalog/level-measuring-tools/digital-angle-gauge-and-level)
Misc:
Moly Grease for the torsion bars & splines
Breaker bar or impact tool can come in handy for the big bolts.
Impact gun for tough bolts with limited access.
Anti-seize for the bolts
Screw driver (or sim) to help line up the bolt holes (I like neednose pliers myself)
Brake Cleaner & shop towels
Dishwashing liquid (to help the new bushings slip into place)
Brass Brush to clean up the threads on bolts etc.
Thread Chaser kit & cutting oil (just in case)
Piece of scrap wood to use to tap the plate cover
(The ER bushing kit comes with 2 long bolts to help get the cover in place)
Deadblow hammer
Handy Torque Specs:
Camber & Toe eccentrics: 85Nm (61 ftlb)
Trailing arm to Spring plate: 120Nm (87ftlbs)
Torsion bar cover bolts: 47Nm (34ftlbs)
Shock to trailing arm: 125Nm (90 ftlb)
Wheel to hub: 130 Nm (94 ftlb)
Sway bar link to trailing arm (stock) 85Nm (61 ftlb)
Basic Removal process: (1988 Carrera 3.2)
Get the car in the air
Remove the wheel
Remove the sill extension (Per side: 3 bolts and 6 phillips head screws + 4 phillips heads on the end caps)
Undo an end cap and then slide the rubber trim along from the panel to expose the screws that hold it to the side of the car. Just peel it off if it wont slide. On the passenger side, two of the 10mm bolts along the bottom do double duty to hold an oil line clamp.
Scribe inside of where the spring plate and trailing arm meet to use as a re-assembly guide
Get a jack under the trailing arm to take the load off of the shock bolt
Undo the lower shock bolt from the trailing arm (22mm)
Disconnect the rear sway bar link from the trailing arm
Remove the nuts for the Toe & Camber adjustment bolts (19mm, leave the camber bolt in)
Remove the 4 bolts from the torsion bar cover (still supporting the trailing arm on your jack)
(some folks prefer to just undo the lower rearmost bolt to keep the arm aligned)
Now let the trailing arm hang as low as it will. Then remove the 19mm nuts & bolts that connect the plate to the trailing arm. Once they are out, let the jack lower slowly until the spring plate is at full droop. (keep supporting the trailing arm) You will probably need to pull the plate off of the trailing arm to clear the camber bolt. (or push the trailing arm inwards)
With the spring plate disconnected and hanging loose, measure the plate angle.
Remove the torsion bar cover. I used a small crowbar to start it and then wiggled it off by hand.
Remove the old spring plate. I was able to wiggle both of them out by hand pretty easily.
My sill covers had prior damage from improper lifting, and when I removed the covers some of the plastic spacers were shattered. Luckily the paint was not too bad, and the sill covers are getting replaced soon anyway. But be prepared to find iffy, missing or broken bits. "while you're there" or "when you discover" is just living with an old car.
I think the key thing as you disassemble the suspension is not to have any tension on the torsion bar when you remove that lower rear cover bolt with the spacer. That's why I removed it prior to disconnecting the trailing arm, to let it all down slowly. I used the extra jack to support the trailing arm while I got those big bolts out. Don't bang them out, the trailing arm is aluminum and you can chew up the threads on the bolts as they go through the plate. Get the tension off of them and they will come out pretty nicely. I unscrewed mine with a wrench to avoid impacts.


Fortunately the old plate came off easily, the bar was not stuck and was in fine shape and there was no rust in the torsion tube. That's a big win. I got the cover started with a small crowbar, and then I was able to wiggle the spring plate assembly by hand and just pull it out easily.
I thought if I marked off the torsion bar's starting position I would not have to re-index to fit the new plate. That was not the case; I spent a little time getting used to the odd dance of rotating the bar on the inside teeth and then re-fitting the spring plate. Knowing the right angle is key so the ride height will be correct when I'm done and I won't have to take it back apart.
Elephant Racing has a handy calculator here if you are changing bars or are looking to change your ride height: https://www.elephantracing.com/tech-topics/spring-plate-angle-calculator/
I used it here to sanity check my measurements. I had a good ride height already, and I had my measurements from the old plate so I felt pretty secure - but it never hurts to check. 34.5 deg is the stock US height per the manual, my car is a tiny bit over EU height and has Bilstein gas shocks fitted so my existing bar position was around 33.5 deg. The ER calculator reads 32.47 degrees for EU ride height at a weight of 2850lbs. A full degree of plate angle works out to about 1/3 of an inch in ride height if I did the math properly.
Addendum: My ride height came out a little high (about 1/2 an inch?) even though I matched the original plate angle within a tenth or two. The gurus at Butzigear who performed the final ride height & alignment said that the sag in the original bushing throws the measurement (and ride height!) off. The car sits a little higher with the new rubber. Live and learn! 20:20 hindsight, I probably should have shot for the 32.5 deg that the ER calculator suggested.
Re-assembly
After cleaning, inspecting and re-greasing the torsion bar, I put it back in it's original orientation (I had marked it with a paint pen). I covered the bushings with liquid soap, and smeared some in the recess where the inner bushing sits.
Next, I tried to mount the new spring plate. One tooth was too low (~31 degrees), the next was too high (~38 degrees). I moved the adjustment screw to get a feel for the range, and it would just barely handle the difference if I maxed it out. I needed to re-index so I could get the plate as close to "right" as I could with the adjuster centered in its travel. I added info on indexing at the bottom if needed.
As a practical matter, the outside splines you can choose from are limited since the bar needs to be at its specific angle. I wound up rotating the inner splines a lot to match up with the new plates. Maybe if I did the math first it would have been quicker, but it wasn't bad to do experimentally. You don't have to slide it all the way on, just far enough to catch the outer teeth. In the end I rotated the bar a little less than 180 degrees counter clockwise such that the '37 degree' reading spline became a '33 degree' reading position when the adjustment bolt was centered. 4 degrees is 240' (4 x 60) and each increment is 10' so I went about 24 teeth CCW to get the bar in the right range.
Use some dish soap on the bushings to help them slide into place more easily. If the process is taking some time, you may want to re-apply more soap along the way. The soap will dry up. (which is what we want in the end)
Use the torsion bar cover to press the new bushings into the chassis. The cover needs to go on very evenly, the bolt holes get out of alignment easily. Start all 4 before starting to tighten them and then go very evenly and slowly. I was able to push the cover on far enough to start the bolts, just by going around it gently tapping with a piece of wood and a dead blow hammer. Some folks have used longer bolts to help with the process (the kit from Elephant Racing includes a pair of longer bolts for this). I needed to chase the threads in one bolt hole, they are M10-1.5. It was just crudded up or partly galled(?) from something.
The rest was pretty straight forwards, use the jack to move the trailing arm or the plate to line up the bolt holes. The trailing arm can move in and out, just pull or push on it. Be sure the car is stable first, of course. I got the camber eccentric through first which helped me pull the plate towards the trailing arm and help get the other 3 bolts in place. I did the toe eccentric next, using the mark I made before I disassembled everything so I had a decent position to return it to.
Once the spring plate is bolted back up to the trailing arm you can reconnect the shock and sway bar.


Notes from the other side
The driver's side took me about 7 hours all in, I went slowly and carefully and wasn't exactly sure what I would run into or which tools I'd really need.
The following day I did the passenger side in about 4 hours, still going carefully but with a bit more familiarity.
How it started:
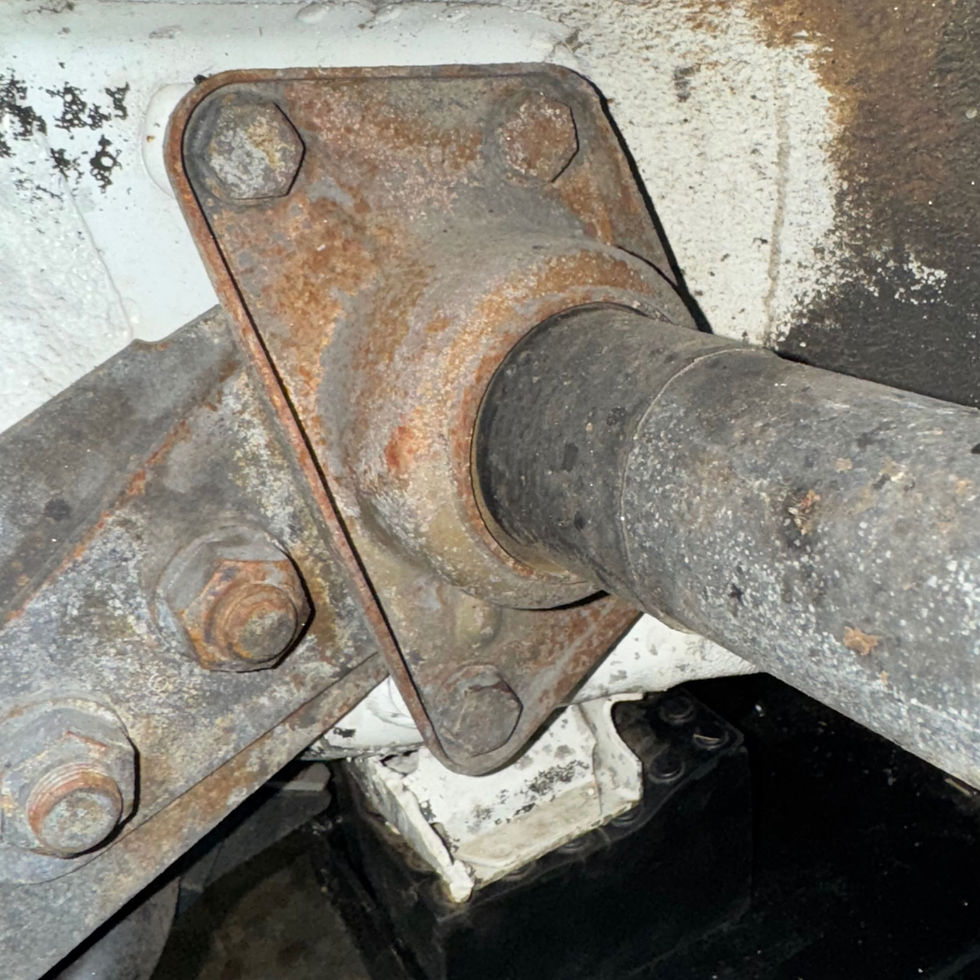

One thing folks do seem to debate online is when/if to touch these bushings. You can see by the pictures above it was past time for these to go.
And here is something I found on the passenger side that made me very glad I did do this work: rust was starting inside the spring plate.

The torsion bar on the right side stuck a little in the cover so they came off together. Fortunately they separated easily by hand. I cleaned off the torsion bar completely, and brushed out the splines looking for paint damage or rust. Luckily the bar looked fine, so I covered it in a new coat of moly grease and re-installed it once the tube was cleaned out.


Net net, the car rode a little high after the plate replacement and needed a proper alignment & ride height setting. The experts at Butzigear took care of that, and now the car is riding just slightly under Euro-height and feels fantastic! They also saw that I was catching my front fender lip in hard cornering and addressed that as well. This kind of old school quality & care deserves calling out, and support.

Indexing Info: 1987-1989 G50 coupes
Indexing never really made sense to me in the books, but in person it was so simple. You rotate the bar where it connects to the chassis, and then rotate the spring plate to keep its position, so you are always going to offset inside tooth vs outside tooth. You may go CW (to increase the plate angle) or CCW, to decrease it.
The stock rear torsion bar diameter is 25mm. (140lbs per inch, per ER calculator)
The stock US spring plate angle target in the shop manual is 34 degrees, +.5 deg for A/C, so 34.5 Deg in my case.
My car measured at 33.5 Deg on the left and 32.5 Degrees on the right with the old parts. Even though I matched these angles within a tenth or two the car came out high, and crooked. Luckily the adjustable plates had plenty of adjustment to address this and we didn't need to re-index.
The late model torsion bar has a different number of teeth than the earlier ones:
46 inner teeth (360/46 = 7.826 deg ea)
47 outer teeth (360/47 = 7.659 deg ea).
1 minute is 1/60th of a degree. (60 minutes per degree)
= .169 degrees difference. (one tooth forward + one tooth back)
x 60 for minutes = 10.02'
10' works out to about 1.4mm of ride height. [ that's 8.4mm per full degree or .33 inches. ]
I had to adjust about 4 degrees down, which winds up being 240' or 24 teeth CCW.
Resources:
Prekom Adjsutable Spring Plates: https://www.prekom-usa.com/product/porsche-911-930-adjustable-spring-plate-g50-transmission-set/
ER Spring Plate Bushings: https://www.elephantracing.com/porsche/911/bushings-bearings-for-911/rubber-bushings/
ER Hardware Kit: https://www.elephantracing.com/porsche/911/spring-plates-for-911/spring-plate-hardware/
URO Stainless Steel Covers: https://www.pelicanparts.com/More_Info/90133315300.htm?pn=901-333-153-00-M1253&bc=c&q=torsion%20bar%20cover%20uro#backToTopAnc
Additional Info:
ER Spring Plate Calculator: https://www.elephantracing.com/tech-topics/spring-plate-angle-calculator/
Prekom (sped up) spring plate reconditioning video: https://youtu.be/W1v9BPYnWOA?si=4CI8vWRVGkVmjj1q

Comments