Replacing a rear wheel bearing
- joepampel
- Dec 9, 2025
- 13 min read
Updated: Jan 20
In which I collect & test a number of approaches found in the wild to see what works. I don't write these because I am an 'expert'. I just try to collect the best approaches I can find and put them into a single document based on what actually worked for me.
I had no idea when the bearing went bad. I drove all summer with the windows open and the sunroof too. It wasn't until it got cold out that I noticed the classic moaning of a bad wheel bearing. It was clearly coming from the rear, and a quick 'slalom' test revealed it got louder on left turns and quiet on right turns. So it was my rear RH wheel bearing. (Once I finished fixing the rear, I could hear the front one moaning as well, same side. Most likely a pothole I hit somewhere.)
I opted to replace the axles at the same time since the labor for that operation is included, the car is 37 years old with over 134,000 miles on it and the outer CV joint is not a serviceable part on the late Carreras. This meant at best I could rebuild the inner CV joint and replace both boots. So I opted for just a bit more money to replace the axle assembly.
The Bentley has general procedures but if you follow them you are setting yourself up for lots of extra work including an alignment.
you do not need to remove the trailing arm from the car
you do not need to open the brake system
you may not need to disassemble the parking brake unit*
Parts / Supplies:
A new wheel bearing. They are fairly inexpensive, I think mine was $45 for FAG (OEM quality).
The axle kits each came with a new axle nut & washer, 6 new bolts for the output flange as well as the 3 straps used with the bolts.
Misc: Penetrating oil, bearing grease, q-tips, brake cleaner, 1200 or 1600 grit sandpaper, a brass brush, neverseize, small buffing wheel, metal polish, Dremel with a cutoff wheel if you need to cut something.
Tools: (links to some tools I used at bottom)
A bearing puller - to remove the old race from the hub
A bearing press - to remove & install the wheel bearing and install the hub
Something to drive the hub out of the old bearing - I used part of a seal installation kit for this. It used an aluminum disc which protected the hub.
Small sledge hammer - used to drive out the hub.
A torch - I used a MAP torch to heat the CV bolts on the output flange of the transaxle
A long 8mm hex socket to remove the CV bolts. The boot will be in the way unless you use a long hex socket. I found a 4" one was about right.
A 36" 3/4" breaker bar or equiv. to break the axle nut loose
A long 3/4" torque wrench (or equiv) to put the axle nut back on later
32mm 3/4" drive deep impact socket to remove/replace the axle nut
I also picked up a 32mm 1/2" deep socket to use with a ratchet to make removing the nut quicker.
19mm deep non-marring socket for the lug nuts
19mm wrenches for the caliper bolts. You can get a socket up top, but the bottom one will need a box wrench.
22mm for the lower shock bolt.
13mm socket for splash shield bolts
Phillips screwdriver for the 2 brake disk retaining screws
Torque figures:
Brake Caliper Bolts 12x1.5. 120Nm = 88.5 ft lb (*? I saw 44 ft lbs here also)
Lower shock bolt gr 8.8 M14x1.5. 125Nm = 92.2 ft lb
Axle shaft to output flange M10. grade 12.9. 83Nm. = 61.22 ft lb
Wheel to hub. M14x1.5. 130Nm. = 95.88 ft lb
Brake disc to hub: M6 gr 8.8 5 Nm
Friction welded (Carrera) axle shaft: M22x1.5. 460 Nm = 339 ft lb
Brake dust shield: 25 Nm= 18.4 ft lb
Parking Brake backplate. 25 Nm = 18.4 ft lb
Basic Procedure
Before you begin, put your new bearing into the freezer. This will help it go in more easily. Well, unless your unheated garage is -8 C. But that's a different post.
With the car on level ground, engage the handbrake as far as you can and put the car in reverse.
Outside the car, remove the center cap on the rear wheel you're working on.
With the long breaker bar and the 32mm deep socket, break the axle bolt loose.
Raise the car
Remove the wheel and then finish removing the axle nut.
Remove the lower shock bolt to move the shock out of the way.
With the parking brake off, rotate the axle to a position where you have good access to the inner flange bolts. I found that about 5 o'clock (if you're facing the transaxle) worked well for me.
Ensure that the inside of the bolt is clean. A q-tip and brake cleaner or mineral spirits are good here. Keep going until the q-tips are clean.
Ensure that your hex wrench is in good shape and you can get full contact with the bolt. You do not want to strip these.
Engage the parking brake, or use a screwdriver in the brake disk vents to use the caliper as a stop. Heat the output flange with the MAP torch where your first bolt is, and then spray the bolt area with penetrating oil. I found 20-30 seconds is plenty of time to heat up. Now break the bolt loose. Repeat as necesary. The bolts are grade 12.9, and 50mm long x 10mm. I kept mine stock. Some folks prefer other types of bolts. Just make sure whatever you use is the correct grade and a full 50mm though. The bolts only thread into the flange and it is thin in the scheme of things. * I have since been told that you really just need threads equivalent to the diameter of the bolt. The stock 50mm long bolts have 15mm beyond the CV joint, a 45mm bolt has 10mm which is the same as the bolt size, so they should be fine. YMMV.
Release the parking brake, rotate the axle to get the next bolt into position, engage the parking brake (or screw driver) and repeat the process. (The screw driver is faster.)
With all 6 bolts out, you should be able to push the axle out of the hub easily now and remove it from the car.
Unclip the brake line from the mounting flange on the trailing arm. This will let you move the caliper around so you can work.
Remove the 2 x19mm bolts that hold the caliper on to the trailing arm. Hang the caliper out of the way as close to its installed height as possible, taking care not to twist or kink the brake line.
Release the parking brake and then remove the rear brake disk - there are 2 phillips head screws. If it won't tap loose, you can use the rearmost bolt that holds the splash guard in place (13mm) it will screw into the other pair of threaded holes in the disk to press it off of the hub. It's not unnusual for them to rust in place.
With the disk out of the way, remove the 3 x 13mm bolts, 2 nuts, 3 lock washers, that hold the splash shield on.
Now you can tap out the hub with a drift. Keep a moving blanket under it so it can't get damaged hitting the floor. The parking brake assembly & cover will help keep the bearing in place.
Next remove the 4 bolts that hold the parking brake assembly in place as well as the bearing.
Disconnect the parking brake cable by removing the cotter pin and then the castle nut & washer. Just pull the cable out the back. Watch the protective sleeve on the cable and the washer at the end as they will just slide off. There is a big opening in the trailing arm for them to fall into.
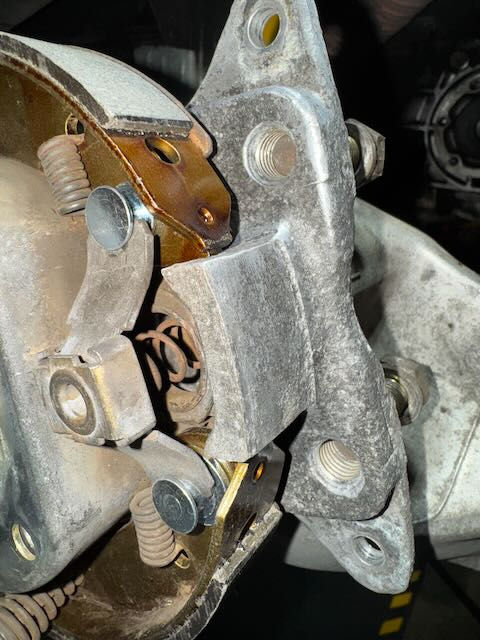
The parking brake assembly should come off as a unit, tap on the front and rear side of it to work it loose. There are 'guides' cast into the bearing housing so it won't wiggle from the top or bottom - it might even get jammed. (see pic). Try not to destroy the plate, they are around $170 each these days. (maybe use a puller if it is really stubborn). I watched one video where the guy destroyed his with a big screwdriver. It is an expensive approach.
With the parking brake assembly removed you should be ready to press out the old bearing. Set the bearing press up with a big open tube in front and a disk large enough to put pressure on the outer race from the rear. Line it up as straight as you can, and it should not take a lot of force to remove the old bearing. You can heat up the housing to help things along.
Once the bearing is out carefully remove any oxidation that has built up especially on the seating area inside the hub (what the bearing gets pressed against) If there are scratches or rust that catch your fingernail you may want to use some super fine sand paper to carefully smooth them down. I used a brass brush for the loose stuff, a razor for bumps & then 1600 grit to clean up the surfaces followed by a quick polish (small buffing wheel on a drill), metal polish ona rag and finally a thorough cleaning with brake cleaner. I think things press together better when they are smooth.
Finally, use a bearing puller to get the outer race off of the hub. I tried heat, I tried cutting into it, using small pry bars and also using a chisel. I got nowhere, and was concerned I was going to cut into the hub. (Keep in mind that a new hub is around $1,000). The bearing puller approach is simple, quick and can't hurt the hub. YMMV.
Clean up the hub surface where it presses into the bearing race. I went over it very gently & briefly with 1600 grit, then metal polish and finally cleaned it off with brake cleaner. Just making sure it is smooth and clean.
Now you are ready to reassemble the thing.
Use the bearing press to push the bearing into the housing. You may want to heat up the housing and then press the frozen bearing into place. You want to push on the outer race while doing this (not the inner race) go slowly, ensure it is going in straight.
Press the bearing in as far as it will go (it will stop when the outer race contacts the lip at the inside of the carrier housing, and you can see this from the back side.
Re-assemble the parking brake and bolt on the retainer plate. Torque the 4 bolts down to 18.4 ft lbs. If you are working alone, you'll want to disassemble the parking brake so that you can re-insert the cable through the actuator arms and get the castle nut back on. Then install the shoes, springs and finally the adjuster. There is more room to work without the hub in place.
Use the bearing press to press the hub into the bearing taking care to support the inner race on the back side. Again, go slow and steady, make sure it is lined up perfectly. You don't get a do over with these. Removing the hub again for whatever reason will destroy the bearing.
Once the hub is in, the rest of the re-assembly is pretty sttraight forwards. I would just recommend adjusting the parking brake as soon as you re-install the rear disk.
I like to use a bit of neverseize on the back of the brake disk where it contacts the hub just to make it easier to remove the next time I need to.
Pics:

The deal with torque is it goes up linearly with the length of the level arm, so to deal with 340 ft lbs it helps to have something about 3X as long as a normal wrench because then you only need to apply 113 ft lbs to it. This is a 3/4" breaker from Harbor Freight that ran about $99. It made a fairly difficult part of the job a breeze. You can also rent big breaker bars at some auto parts stores if you prefer. A pro quality impact wrench can do it too.

Once the nut and washer are off, the axle should be free to move in and out a little. Worst case you could engage the parking brake and use a 3-jawed puller to pull on the disc while pushing the axle inwards. Or tap it loose with a non-marring hammer. After 37 years my axle pushed in easily by hand.

There is a brake hose retainer clip that just slides off to the rear. Once that is out, the brake line can be freed up and moved a little bit which allows you to hang the caliper.

I tried the bolts from a couple of angles and this one seemed to work the best for me. Lying under the car I had good leverage and could stabilize my wrist on the axle.

Brakleen (and q-tips) to clean out the heads of the hex bolts or mineral spirits is very good as well. A basic plumbing torch to heat the output flange and p-blaster to help loosen up the hot bolt. Last but not least, a long 8mm hex socket to let me get past the CV joint boot easily. This one is 4".

Next I used a drift from a seal installation kit to knock the hub out. The smallest seal fitting was just the right size, and was aluminum which helped to protect the hub. I tapped it with a nice small sledge to let it know I was serious. It came out easily, maybe 3 or 4 taps. You can see the outer race came with the hub. This is expected. That same little drift along with the axle nut washer were just what I needed to fit a bearing press on to the hub and remove that outer race later on.

With the hub out, you can access the parking brake & bearing retainer plate. The parking brake assembly can be removed intact once the cable is disconnected (unless it's really rusty)

The outer set of bearings just pulled out. You can see where there was oxidation on the outside of the housing that needed to get brought down.

Inside wasn't much better. Of particular concern was all the build up along the rim where the new bearing will seat in the carrier when it is pressed in.

Here is the old bearing with most of the press still attached. It's just missing the big hollow pipe section that goes in front to let the bearing come out. The big side of the bolt here is 32mm which is pretty handy, the other end is 27mm.

Here is the housing after being cleaned up. I was very careful not to remove material, just the rust to the extent possible. I buffed it using a Dremel and cleaned it carefully afterwards.

The axle washer is exactly the right size to sit on the hub and allow the bearing to slide by. On top of it went the piece from the seal tool and then a centering tool from the bearing press kit. I didn't have a full press kit so I used a 2-jawed puller with the collar from a bearing puller kit. If you have a full bearing puller kit you'll have the bolts to go into those threaded holes and the yoke to sit on top.

The hub, all ready to get cleaned up and painted, along with the tools I used.
Reassembly:
Press the new bearing in. The press on the front side should be bigger than the bearing so it seats flat with the housing. The rear fitting just needs to not interfere.

Re-install the parking brake plate & cover. In my case one of the shoes had lost a locating peg so I replaced the shoes.

The old brake shoes. You can see the hole where the other locating 'pin' should be. They are just pressed into the shoes.
The actuators are fit to both sides of the shoes, with a spring between them. If you don't set them up prior to installing the shoes you will probably need a helper to get the cable properly installed since you need to simultaneously press the cable into the assembly while pressing down on the actuator and fitting the washer and castle nut. If you're working alone, you just disassemble the parking brake, run the cable through the actuators and then assemble it all front to rear (see the Joe Engineer video)

Here the parking brake assembly is back in place and I'm using the bearing press to re-install the hub. You want to use a big enough disc on the front to locate on the raised ridges and on the backside a disk that is just big enough to support the inner race and stabilize the press. Just press the hub in until it stops, just like the bearing. It should be pretty simple to line up, just go slow.

With the hub in place you can install the axle. I put all 6 bolts in place first since the boot is in the way. You won't be able to fully torque the 6 bolts on the output flange until the disc is back on and you can use the parking brake to stabilize the axle. You could put a pry bar into the wheel studs and brace it on the floor in a pinch or use the screwdriver trick of course (if the disk and caliper are back on).
I used a q-tip to apply grease to the inside of the hub where the splines engage to help prevent corrosion. Some folks prefer neverseize. Same idea though.

Re-install the splash shield and then re-install the disc. Adjust the parking brake and then use it to enable you to torque down the CV joint bolts. I rotated the axle to let me tighten them in 2 or 3 steps using a criss-cross pattern. Mark the bolt heads with a paint pen so you can easily see if they move over time. I plan on checking these in about 100 miles just to make sure.
Use the handbrake or screwdriver to let you tighten the axle nut as much as you can safely with the car raised up. Gently pull the axle towards you to expose the full thread for the axle nut.
Finally, re-install the caliper, put the clip back on the brake line and re-connect the lower shock absorber mount and now you should be good to install the wheel and lower the car.
Last, torque down the axle nut to full torque with the car on the ground, handbrake on and transmission in reverse. 340 ft lbs is more force than your engine produces so the car will want to move. If you have an assistant, have them sit in the car and stand on the brakes for this.
Go for a short test drive keeping in mind the first time you use the brakes they may not engage normally if you have had to push on the pads at all.
Resources:
Pelican Parts Forum threads I read through:
YouTube Videos I referenced:
Links to some of the tools I used: (these are not sponsored in any way)
Bearing puller (remove old outer race from hub)
Bearing press (remove old bearing, install new bearing, install hub)
Seal / Bearing kit (there are cheaper ones too) - used here to drive out the hub. This kit comes with an air hammer adapter as well as a hand adapter.
3/4" torque wrench: to install the axle nut
3/4" breaker bar: to remove the axle nut


Comments