Fixing our Fridge
- joepampel
- Dec 29, 2025
- 4 min read
Our refrigerator came with the house. It's a big stainless steel GE Monogram with an ice an water dispenser. Our first fancy fridge. The unit appears to date to about 2008. It has always worked nicely for us but this past summer it suddenly went on the fritz. The dispenser control panel would not respond and then the whole thing, fridge & freezer, stopped chilling. Even the interior lights didn't work. Last Christmas it was the oven. Now it's the fridge. Are we on some kind of annual cycle?
I consulted the mighty interwebs to see what I could find out. This particular model has a main controller board up top by the compressor, and another board by the dispenser. Often you can find the owner's manual online, and even if you can only find an exploded parts diagram, that can be a huge help both in disassembly as well as understanding which parts may be involved in a repair.
I checked the GE site along with the normal appliance repair parts sites and eBay for available parts. I found a controller board on eBay for about $100. A new one was around $220. Considering a 36" stainless fridge could run us anywhere from $1,000 to several thousand dollars, it seemed like a reasonable bet to try and fix it for $100. I found a deal on a dispenser board as well, and also ordered it, for future use if we need it. If the compressor or associated plumbing was suspect, I would call for a pro. You need specialized tools etc. to deal with finding leaks, recharging and so on.
I suspected the main controller board was bad since it would not chill or even light up. (I had already checked for a bad fuse) If the only malfunctioning thing had been the dispenser I would have only ordered it. At the end of the day, a fridge is an air conditioner bolted to an insulated steel box. It should last decades. It's an incredible waste to replace it because a $2 electric component failed. The controller board handles a bunch of basic functions like defrost, temp control and so on. If I ran the world they would be generic parts.
So I ordered the new board. One nice thing about the somewhat modern nature of the device is that all of the wiring connectors had only one place they could connect to. They all had different numbers of pins. They were clearly keeping assembly simple for the folks on the line.
High level steps for this type of Fridge:
Throw the breaker for the fridge or unplug it so there is no power to it.
Flip open the compressor compartment up top. (where you change the water filter)
The board has a number of wiring harness plugs to disconnect as well as some plastic standoffs that hold it in place. (see pics)
Remove the old board, install the new board. Be very careful of the standoffs so that they don't break.
Once you are sure everything is properly connected and seated, throw the breaker to send power to the fridge.
It should work now.
Pics:

Step 1 - find your model and serial numbers. There can be running changes where a certain part is only correct up to some SN or after some SN.

Step 2 - See if the Mfr has info available. Thankfully GE has done a nice job here, including posting the owner's manual online.

Step 3 - find a parts diagram and part number for the component you are looking for. 703 is our controller board.

Here is the part number, proper name and replacement cost. Now we can look for options. Sometimes these kind of components will be used across a range of appliances or even across brands.

Here is the board I bought on eBay as it arrived. It had clearly never been used and came in a nice anti-static bag.

Ok, flip up the cover to the overhead compartment where the compressor and water filter are located. The controller board is under this big steel cover.
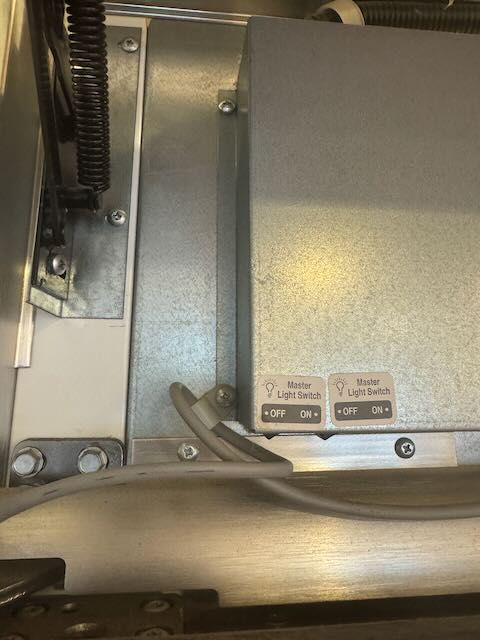
Note the wire routing on the left side so you can put it back the same way.

Note the wire routing on the right side
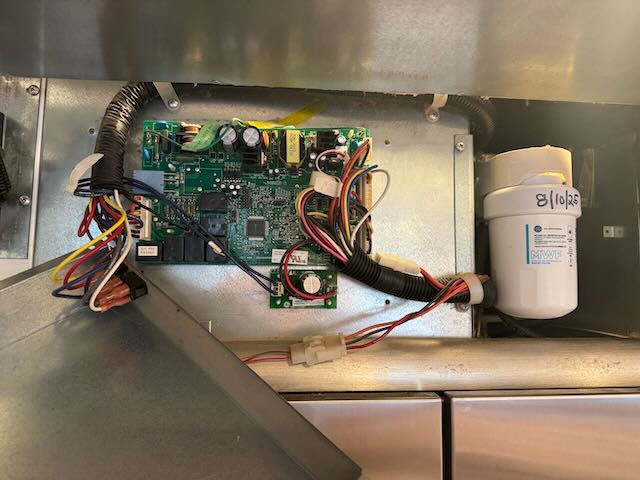
Now we have removed the cover to see what we're dealing with. It looks like a lot of wires, but it really isn't. There are 7 multi-pin connectors which are all different sizes, a single spade connector (black wire) that goes to point J12 on the lower LH section of the board, and the 2 ground wires which come with the new board already attached.

Look all around the board for any connections you might not notice at first. Here, under the tape on top there is a ground connection to the steel chassis. That will have to get unscrewed and put back later.
Disconnect all of the cables in preparation to remove the board. In the case of this unit, each multi-pin connector only had 1 place it could go. I took photos of them all as well as the single wire with a spade connector so that I could know where they would all go.

The board is held in place by 4 plastic standoffs. You squeeze them and pull the board up gently. There is one under the wiring harness at the lower RH corner. Go slowly and gently until you are positive you have cleared all of the standoffs.
Make sure you are not carrying a static charge whenever you touch digital electronic devices like this. One spark can fry them. Wear cotton, use a static wrist band if you have one, etc.

Ok, the board is out! You can see the 4 standoffs clearly here. The new board will just get pressed down gently over them, and then you re-connect all of the wiring.

Here is the new board in place, the ground up top is in, the spade connectors and multi-pin plugs are all snug. After double checking all of the connections I turned the breaker back on for the fridge.

And we're back!
Resources:
GE Monogram Parts: https://www.geapplianceparts.com/monogram-replacement-parts.html
Home Page for our Model: https://www.geapplianceparts.com/store/parts/assembly/ZISP420DXASS?ModelType=ModelType
Comments